How to Setup MulVAL in 2023

The year is 2023. There’s no denying that the technology has advanced a lot since, say 2015, but unfortunately as a researcher in the academia, I sometimes run into messy stuff.
Such is the topic of today’s blog post. (As of writing) MulVAL is still the gold standard in terms of attack tree generation and analysis, and it is frequently cited by security-inclined papers. Unfortunately the code was written in 2015, and after years of upstream system and software changes, the current version won’t compile on a modern Linux system (and no prebuilt binary is provided).
It took me a good part of a week to go through error messages, figure out what’s wrong, manually fix the source, and repeat. But luckily after some tedious (but cosmetic) changes, the source can be still compiled with the right combination of dependencies. Interested in how? Let…
Actually, before I start, I will admit that there is an easier way. In fact it’s so easy you can get it set up in a fraction of time required otherwise. And, you may have guessed it, there are pre-configured Docker images that do just that.
1 MulVAL on Docker
As with all other Docker containers, they are self-contained and do not require any setup other than
Docker itself. It will be more difficult to interact with it, however: you cannot call graph_gen.sh
or xsb directly from the host (there’s a trick that alleviates this issue), and you have to set up
directory bindings so they can be accessed by the container. Any change you made inside the container
will be lost upon exit (unless persisted
through volume).
If that sounds ok to you, go ahead and give it a spin! If you’d rather install it from scratch, go ahead and skip to the next section.
1.1 Preparations
An official Dockerfile is provided in their GitHub repo. In addition,
I found at least two MulVAL images (apparently based on the said Dockerfile) on the Docker registry.
Here I will use the most popular one for demonstration - you can also build from scratch using the
Dockerfile provided.
First, pull the image from the Docker registry.
docker pull wilbercui/mulval
After this completes, you can start a bash session to explore around.
docker run --rm --name mulval -it wilbercui/mulval bash
--rm removes the container when the execution ends
-it starts an interactive tty session (technically not correct, but it’s close enough)
bash starts a bash session
This Docker image is based on Ubuntu 15.04, and in /root directory you can find MulVAL files
(in /root/mulval) along with other stuff. However, as I mentioned previously, the container
won’t do anything interesting before we hook it up to a directory on the host, so we will do just that.
1.2 Create Data Directory
We first create a directory to store our input and output files. In this example, we will be using
~/graphs folder.
mkdir ~/graphs
Suppose I also copied an input source file input.P to the folder (i.e. ~/graphs/input.P).
1.3 Run Graph Generation
To generate attack graphs, we just need to run the following command.
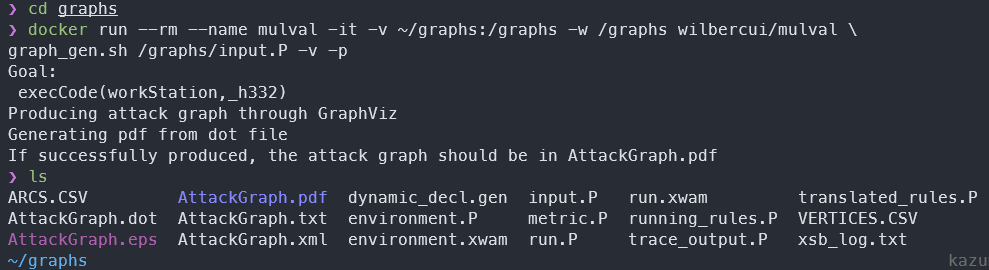
docker run --rm --name mulval -it -v ~/graphs:/graphs -w /graphs wilbercui/mulval \
graph_gen.sh /graphs/input.P -v -p
-v binds the ~/graphs volume on the host to /graphs inside the container with R/W access
(Note: this approach is NOT stable because ~ refer to your home directory. You may want to change it to an absolute path.)
-w changes the default working directory to /graphs (in the container). Otherwise it defaults to / root directory.
And what follows instead of bash is the usual commands to generate the graph.
We can verify that everything went successfully by checking the content of ~/graphs on our host.
You can also run other commands in a similar fashion, for example you can invoke attack_graph directly, or
run xsb.
1.4 QoL: Shell Function
It’s quite inconvenient to type out all that command every time you want to run the MulVAL. Fortunately we can save them as a shell function to save some typing. The following is an example of what you can do.
| |
Save this function in appropriate places, for example ~/.zshrc if you use zsh, or ~/.bashrc if you use bash. Then run exec zsh (exec bash if you use bash) to apply the changes.
mulval_exec ~/graphs graph_gen.sh /graphs/input.P -v -p
This is equivalent to the previous lengthy docker run... command.
It’s worth noting that this function takes the first argument ($1) and apply it to the volume binding
section, so whatever you supply in $1 will be bound to the /graphs directory in the container.
It takes all the remaining arguments (${@:2}) and pass it as the COMMAND to execute in the container.
So you can supply any command of any length and it should just work.
This concludes the walkthrough to set up MulVAL on Docker. Let me know if you have any questions!
2 MulVAL from Scratch
Maybe you just like more control over it. Maybe you just like it the harder way. However the case be prepared for a more engaged experience.
2.1 Requirements
I don’t think there’s any hard requirement other than a Linux environment and an internet connection. However, the following guides are based on Ubuntu 22.04.2 LTS (the latest at the time of writing), so your milage may vary if you use a different distro.
2.2 Dependency Setup
MulVAL has one hard dependency: the XSB logic engine. And you can optionally install GraphViz if you want to export the attack graph as a… graph, and MySQL if you want NVD integrations (which I will not cover, but you can read the documentation to find out how). You also need basic compilation tools to compile MulVAL binaries from scratch.
Run the following commands to install dependencies.
| |
(these packages take about 1073 MB of disk space)
Next, we download the XSB source code and unpack the archive at /usr/local/bin.
wget "https://sourceforge.net/projects/xsb/files/xsb/5.0%20%28Green%20Tea%29/XSB-5.0.tar.gz/download" -O - | \
sudo tar -zx -C /usr/local/bin
We configure and install the XSB by executing the following.
| |
The XSB is now setup and ready. Before we go, we need to set up some environmental variables.
| |
2.3 Patch MulVAL Files
As I mentioned previously, MulVAL source does not compile on a modern Ubuntu release. However, if we make several changes to the code, it can still be compiled and used.
Fortunately, @giper45 on Github has noted most changes needed on their pull request. Unfortunately though, the repo seems to be largely abandoned, and the PR is not merged in the current branch. My shoutout to @giper45 for compiling these changes - otherwise I have to spend much longer to retrace all the errors!
We start by first pulling the MulVAL repo.
cd ~ && git clone https://github.com/risksense/mulval.git
Then download and apply this handy patch generated from the said PR.
| |
Ignore the whitespace error as they won’t really hurt us…
The url above is actually from one of the lesser-known API available on GitHub.
For example, if I want to generate a patch from the following PR https://github.com/risksense/mulval/pull/9
I would just append .patch or .diff to the URL, to make for example
https://github.com/risksense/mulval/pull/9.patch
Voila, you get a patch file made out of the PR!
2.4 Compile MulVAL
That’s it, we’ve arrived at the climax. Go ahead and compile it!
make
Everything should just fall into the place. Congratulations, you have successfully installed MulVAL on your machine!
To test it, you can execute the following (from preferably an empty directory)
graph_gen.sh input.P -v -p
And verify that the output is produced as desired.
2.5 QoL: $PATH Modification
Just one more thing to make our lives much easier. To be able to run the commands like
graph_gen.sh, attack_graph, and xsb from anywhere, we need to add them to $PATH.
Add the following lines to your .zshrc (.bashrc):
| |
That way, these changes will stay even after we reboot.
You have reached the end of this wonderful journey. Give yourself a pat in the back knowing you just revived an archaic piece of technology 😎
If you have any comments or suggestions, feel free to post them below!
If you find this post helpful, please consider buying me a coffee :)